Contents:
- Understanding Short Hair Structure and Drying
- Essential Tools and Products for Blow Drying Short Hair
- Choosing the Right Blow Dryer
- Styling Brushes and Combs
- Styling Products for Short Hair
- How to Blow Dry Short Hair: Step-by-Step Technique
- Preparation Phase
- First Section: The Crown and Top
- Second Section: The Sides
- Third Section: The Back
- Finishing Phase
- Blow Drying Short Hair vs. Air Drying Short Hair: Key Differences
- Styling Variations for Different Short Hair Types
- Short Straight Hair
- Short Curly or Textured Hair
- Wavy Short Hair
- Expert Guidance on Short Hair Blow Drying
- Common Mistakes When Blow Drying Short Hair
- Time Breakdown and Routine Planning
- Product Budget for Blow Drying Short Hair
- Maintenance and Longevity of Your Short-Hair Blow-Dry Style
- FAQ
Approximately 45% of people who cut their hair short for the first time struggle with blow drying, often creating styles that look nothing like their stylist’s result. The misconception is that short hair doesn’t require blow-drying technique—it simply dries quickly. In reality, short hair requires precise technique and product knowledge to achieve polished results. Mastering how to blow dry short hair transforms your daily routine and ensures your cut looks intentional rather than undone.
Understanding Short Hair Structure and Drying
Short hair (typically defined as chin-length or shorter) dries fundamentally differently than longer hair. Because short hair has less weight, it’s more susceptible to direction-dependent drying. The way you dry your hair determines the style—there’s no “growing out” a bad blow-dry day as you can with longer hair. Short hair requires approximately 5-10 minutes of blow drying compared to 15-30 minutes for shoulder-length hair, but those 5-10 minutes demand more precision and focus.
Short hair’s density becomes more visible. Longer hair’s weight spreads the hair across a larger area, making fine or thin hair appear fuller. Short hair concentrates on a smaller surface area, making density very obvious. This means styling and product application matter significantly—the same technique and products that work acceptably on long hair become critically important on short hair.
Essential Tools and Products for Blow Drying Short Hair
Choosing the Right Blow Dryer
For short hair, a moderate-power blow dryer is ideal. Professional ionic dryers (approximately £40-120) work beautifully for short hair. These emit negative ions that reduce frizz and improve shine compared to budget dryers. You want a dryer with variable heat settings—most short-hair styling happens on low to medium heat, not high heat. High heat damages short hair disproportionately because it concentrates heat on smaller amounts of hair.
Look for a dryer with a concentrator nozzle attachment (most include this). This nozzle focuses airflow into a concentrated stream, allowing directional control. For short hair, this control is essential. Wide-nozzle attachments (approximately 8-10 centimetres width) work best—they’re narrow enough for directional control but broad enough to dry sections efficiently. Budget under £50 for a functional short-hair dryer; premium features beyond variable heat and concentrator nozzle provide diminishing returns.
Styling Brushes and Combs
Short hair requires small brushes. A round brush with a 25-30 millimetre diameter works perfectly for most short styles. Larger brushes are difficult to control on short hair and can create awkward curves. Paddle brushes work well for smoothing and directing volume. Avoid fine-tooth combs; instead, use wide-tooth combs that won’t snag short, delicate sections.
Quality matters here. Cheap brushes with nylon bristles create static and frizz. Invest in a brush with natural or ceramic-coated bristles (approximately £8-15). This single tool investment pays dividends through reduced frizz and better styling control.
Styling Products for Short Hair
Product selection is critical because short hair amplifies product visibility. Heavy products make short hair look greasy or weighed down. Instead, use lightweight, water-based products. Volumising mousse (approximately £5-8) applied to damp hair before blow drying creates texture and grip. This prevents short hair from falling flat. Lightweight styling creams or pomades (£4-10) applied after styling add definition without heaviness.
Texturizing sprays (approximately £4-8) add grip and make styling hold longer. Dry shampoo (£3-6) absorbs oils and adds texture to second-day hair, extending your style. For short hair, keep products minimal—typically you’ll use one styling product maximum. Too many products create buildup visible on short hair.
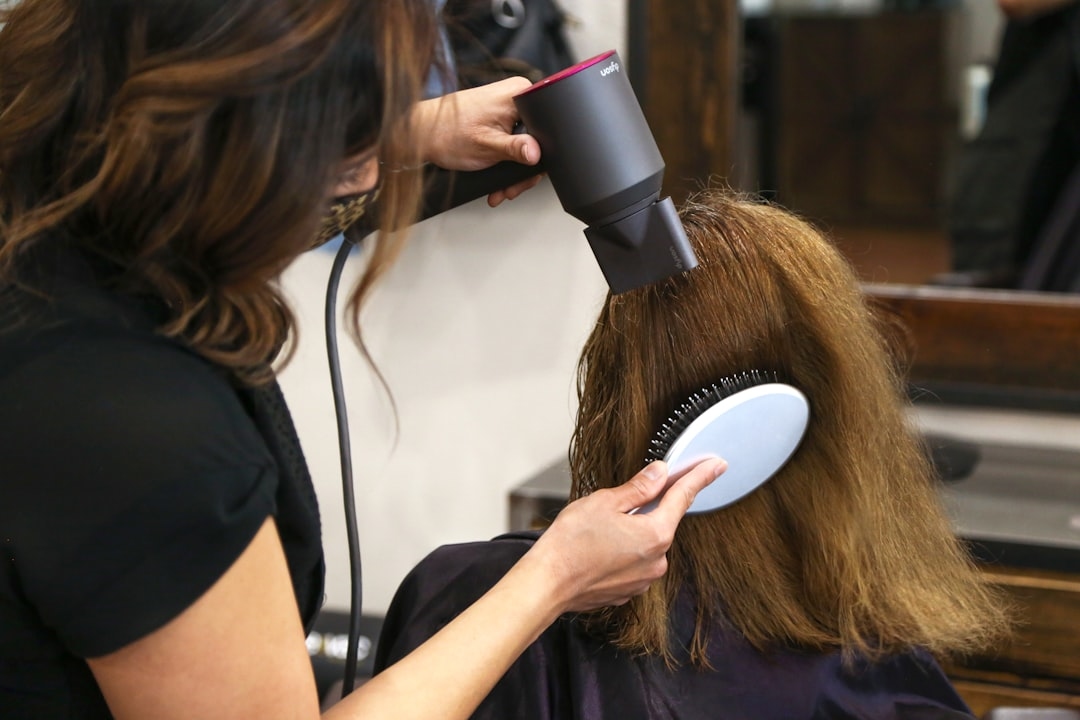
How to Blow Dry Short Hair: Step-by-Step Technique
Preparation Phase
Start with damp, not soaking, hair. Squeeze excess water out with a microfibre towel (not regular towels, which cause friction damage). Your hair should be approximately 70% dry—still visibly damp but not dripping. Apply styling mousse to damp hair, working it through from roots to ends. Use approximately 10ml (a golf-ball sized amount) for most short styles. Work the mousse through with your fingers, distributing evenly.
First Section: The Crown and Top
Begin at the crown—the highest point of your head. This area sets your style’s foundation. Clip away the sides and back temporarily using small clips, leaving only the crown section free. Use your blow dryer on medium heat with the concentrator nozzle. Direct the airflow from the roots upward and slightly backward. This creates lift at the crown. Use your fingers or a round brush to guide hair upward as it dries.
Spend approximately 1-2 minutes on this section, moving the dryer constantly. Never concentrate heat on one spot; continuous movement prevents heat damage and creates even drying. Once this section is 90% dry, move to the next area.
Second Section: The Sides
Release the side section on one side (typically your non-dominant side). Direct the dryer’s airflow toward the back and slightly upward. Most people prefer sides dried slightly back and toward the crown, creating a styled rather than flat appearance. Use your fingers to direct the hair as you dry, or use a small round brush if you prefer more control. This section typically takes 1-1.5 minutes.
Repeat on the opposite side, drying in the same direction for consistency. The two sides should dry in matching patterns. If you’re creating a side part, slightly dry one side more toward the part than the other to emphasise it.
Third Section: The Back
The back section is largest and typically takes longest. Divide it mentally into two halves—lower back and upper back (nape area). Start with the lower back. Direct the dryer upward and slightly away from your head, creating volume and movement. Short hair in the back can be dried straight back, slightly to one side, or even slightly forward depending on your style preferences.
Use a round brush in the back section if your style requires more control and smoothness. Direct the brush under sections of hair as you dry, creating uplift. This typically takes 1.5-2 minutes for the full back section.
Finishing Phase
Once all sections are 90% dry, switch to cool air setting on your dryer (approximately 10-15 seconds). Cool air seals the cuticle layer, creating shine and helping your style hold longer. Run cool air through all sections quickly. This finishing step takes only 20-30 seconds but significantly improves results.
Blow Drying Short Hair vs. Air Drying Short Hair: Key Differences
Air drying short hair typically takes 20-30 minutes and creates a more natural, undone appearance. Blow drying takes 5-10 minutes and creates more deliberate styling. Both are valid approaches; the choice depends on your time availability and desired look. Air drying short hair works beautifully for casual, textured styles. Blow drying works better for polished, controlled styles. Many people blend both methods—rough dry with fingers for 2-3 minutes to remove excess moisture, then air dry the remainder. This provides a middle ground: intentional styling without full blow-dry time investment.
Styling Variations for Different Short Hair Types
Short Straight Hair
Straight hair dries quickly and can look flat without technique. Dry straight hair using volumising mousse and directing airflow upward to create lift. Use a round brush underneath sections to create subtle curve and movement. Finish with texturizing spray for grip and definition. This prevents the “helmet” flat-hair appearance common with straight short hair.
Short Curly or Textured Hair
Curly short hair requires different technique. Use a diffuser attachment on your blow dryer (approximately £5-15, fits most dryers). The diffuser spreads airflow gently, enhancing curl definition without disrupting the curl pattern. Apply styling mousse or curl cream to very wet hair before blow drying. Dry on medium heat, using the diffuser to dry sections thoroughly. Curly hair holds definition beautifully when properly dried with a diffuser.
Wavy Short Hair
Wavy short hair benefits from enhanced texture. Dry using a concentrator nozzle, directing airflow to enhance waves rather than flatten them. Use a round brush to create subtle curves and movement. Texturizing spray post-drying adds definition and grip to waves, making them more pronounced and intentional-looking.
Expert Guidance on Short Hair Blow Drying
According to Sarah Richardson, Senior Stylist at James Brown Salon (London) with 15 years’ experience cutting short hair: “The single biggest mistake I see is people blow drying short hair too quickly. They think because hair is short, they can rush the process. In reality, short hair demands more attention to direction and technique because every strand is visible. I tell clients: spend five minutes blow drying correctly rather than two minutes haphazardly. The style difference is dramatic. Also, people often use wrong products—they apply heavy styling products meant for longer hair and create greasy-looking results. Short hair requires lightweight, barely-there products. If you can see product residue in your hair, you’ve used too much.”
Common Mistakes When Blow Drying Short Hair
- Using high heat on short hair: High heat concentrates on smaller amounts of hair, causing disproportionate damage. Use low to medium heat exclusively. Even fine, delicate short hair tolerates medium heat better than high heat on a small amount of hair.
- Blow drying downward: This direction presses short hair flat against the scalp. Always direct airflow upward and back to create lift and movement. Downward airflow creates the opposite of the desired effect.
- Overusing styling products: Short hair amplifies product visibility. More product doesn’t create better results—it creates greasy, heavy-looking hair. Use approximately 50% of the product amount you’d use on longer hair.
- Not prepping with mousse or volumiser: Styling mousse creates texture and grip that makes short hair hold style all day. Skipping this step results in hair that falls flat by afternoon.
- Blow drying soaking wet hair: Soaking hair takes longer to dry and is harder to control. Squeeze excess water first, reducing drying time and improving control.
- Using a round brush that’s too large: Brushes larger than 25-30 millimetres are impossible to control on short hair. Invest in a small round brush specifically designed for short styles.
- Concentrating heat on one spot: Holding the dryer stationary damages hair and creates uneven drying. Keep the dryer constantly moving across your head.
Time Breakdown and Routine Planning
A complete short-hair blow-dry routine takes approximately 10-15 minutes for beginners, 5-8 minutes once you develop proficiency. Breaking this down: towel squeeze (1 minute), mousse application and finger combing (1 minute), blow drying (5-8 minutes), cooling phase (30 seconds), and finishing products (1 minute). Practice the technique daily for one week—by day 7, you’ll develop muscle memory and cut total time significantly.
For time-constrained mornings, rough dry for 3-4 minutes using only your fingers (no brush), focusing on the crown. This removes excess moisture and creates basic lift. The remaining drying happens naturally as you get ready. Your hair won’t be perfectly styled but will look intentional and polished enough for most situations. This “partial blow-dry” approach takes 3-5 minutes.
Product Budget for Blow Drying Short Hair
Monthly product budget for regular short-hair blow drying:
- Volumising mousse (lasts 8-12 weeks): £5-8, approximately £1.50-2 monthly
- Lightweight styling cream or pomade (lasts 12-16 weeks): £4-8, approximately £1-2 monthly
- Texturizing spray (lasts 8-12 weeks): £4-8, approximately £1.50-2 monthly
- Total: approximately £4-6 monthly for products
A quality blow dryer (one-time investment): £40-120. Spread across typical dryer lifespan (3-4 years), this equals approximately £1-4 monthly. Round brush (one-time): £8-15, spread across 2-3 years equals approximately £0.50-1 monthly.
Total monthly cost: approximately £5.50-11 for a complete short-hair blow-drying routine. This is significantly less expensive than professional styling whilst achieving professional-looking results.
Maintenance and Longevity of Your Short-Hair Blow-Dry Style
A properly blow-dried short style holds approximately 24-36 hours depending on hair type and products. Day-one styling is always best. By evening, you can use dry shampoo (approximately 3-5 sprays) to refresh texture and extend style. Day-two hair often looks more interesting because texture builds; many people prefer day-two styling. Day-three hair typically requires a full wash and blow-dry to look fresh.
For frequent blow dryers concerned about heat damage, limit blow drying to 4-5 days weekly, air drying the remaining 2-3 days. Short hair looks acceptable air-dried (more natural than blow-dried), making this balance practical. This reduces weekly blow-dry time from 40-75 minutes to approximately 20-40 minutes whilst still achieving polished looks most days.
FAQ
Q: How often should I blow dry short hair?
A: This depends on your preference and hair type. Some people blow dry daily; others 3-4 times weekly. Short hair air dries acceptably, so you can alternate between blow drying and air drying. Most professionals recommend blow drying 4-5 times weekly maximum to limit heat exposure.
Q: Can I blow dry short hair without a brush?
A: Yes, absolutely. Use your fingers to guide hair direction whilst blow drying. This creates a more natural, textured result. A round brush creates smoother, more polished results. Both are valid approaches; choose based on your preferred style.
Q: What’s the best blow dryer for short hair?
A: Look for: ionic technology (reduces frizz), variable heat settings (essential for avoiding damage), concentrator nozzle (for directional control), and moderate power (approximately 1200-1800 watts). Expect to spend £40-80 for a quality short-hair dryer. Brands like Dyson are premium but excellent; budget brands work fine if they have these features.
Q: Should I blow dry short hair towards or away from my scalp?
A: Direct airflow away from your scalp (upward and backward). This creates lift and movement. Directing airflow toward your scalp presses hair flat, creating the opposite of the desired effect.
Q: How do I prevent frizz when blow drying short hair?
A: Use ionic blow dryer, apply smoothing serum or lightweight styling cream to damp hair before blow drying, finish with cool air setting to seal cuticles, and use a round brush rather than fingers for smoother results. These combined techniques virtually eliminate frizz.
Add Comment